Thursday, March 31, 2011
Wednesday, March 23, 2011
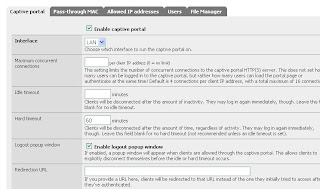
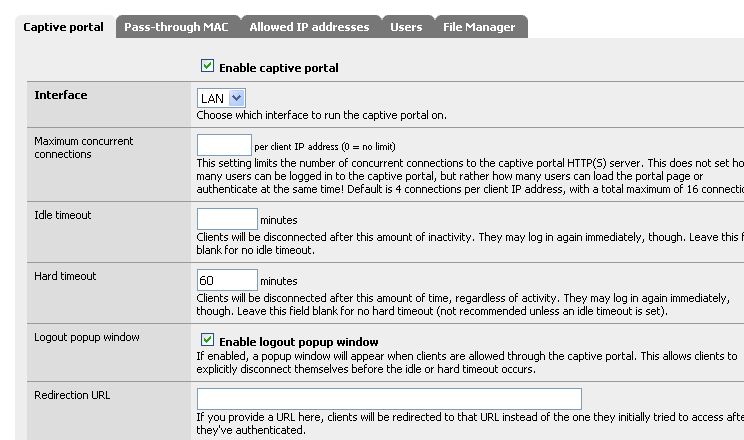
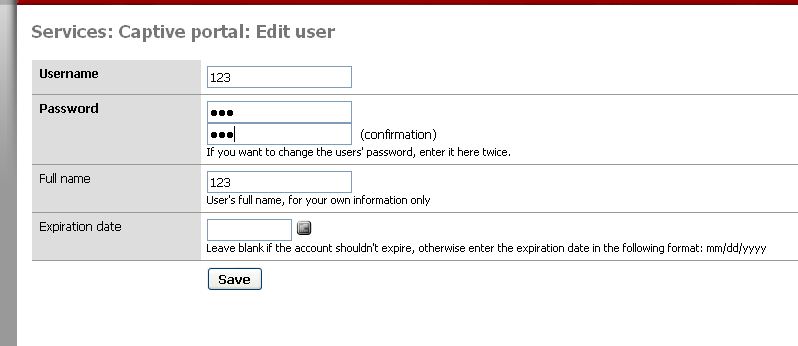
Captive portal... Last minut service
Captive portal is a PFsense tool the gives you the oppetunaty to insert a Login page long before you reatch the "Internet".
" The captive portal technique forces an HTTP client on a network to see a special web page (usually for authentication purposes) before using the Internet normally. A captive portal turns a Web browser into an authentication device.


" The captive portal technique forces an HTTP client on a network to see a special web page (usually for authentication purposes) before using the Internet normally. A captive portal turns a Web browser into an authentication device.
Monday, March 21, 2011
Summary of Iteration 4
The fourth and finall iteration of the project, did't go as good as expected. Several tasks were planned at the beggining of the iteration, and some of them were with an idea of further splitting in oreder that each group member had 1 more task after completing the vital tasks. Unfortunatelly due to some various problems with the tasks, not all of them were splitted and accomplished. The final demonstration didn't go too good, due to some missunderstandings, but the main idea of the project was covered and demonstrated. Now the group is procceeding with documenting the whole project.
Friday, March 18, 2011

Thursday, March 17, 2011
Gallery section for website
The gallery section for the 2 Foot's website is working. After going through some various problem with installing a software called "Plogger", the group picked up another one, called "Gallery". In order to have it up and running on the webserver, a mysql database was created and a phpmyadmin was installed for easier managment of it. The "Gallery" provides the users with the ability to go through different directories with pictures, comment on them, rate them and much more. The aministrator can create and edit directories, manage users and decide on security level.
Below you can see a print screen of the main page of the directory, where you can select the album you want to watch:

Reference: http://gallery.menalto.com/
Below you can see a print screen of the main page of the directory, where you can select the album you want to watch:

Reference: http://gallery.menalto.com/
Wednesday, March 16, 2011
Darkstat for mornitoring trafic
Darkstat
Darkstat is a network statistics gatherer.
Effectively, it's a packet sniffer which runs as a background process on a
cable/DSL router, gathers all sorts of useless but interesting statistics,
and serves them over HTTP.
Darkstat is a network statistics gatherer.
Effectively, it's a packet sniffer which runs as a background process on a
cable/DSL router, gathers all sorts of useless but interesting statistics,
and serves them over HTTP.
Darkstat is an addon to PFsense and can be fount in the System -> Packet

Darkstat have some features:
Traffic graphs.
Tracks traffic per host.
Tracks traffic per TCP and UDP port for each host.
Tracks traffic per host.
Tracks traffic per TCP and UDP port for each host.

Those were to monitor

Table to show who,where and how long a client have ben to a certen website

Tuesday, March 15, 2011
Tasklist For Iteration 4
Test network
Make report (further spliting)
Correct the use-case diaagram Working
Add restriction in pfsense Working
Make a gallery section on the website Done
Make the access to the network go through the proxy Working
Decide on security level Done
Warning administrator with mail, upon a try to open restricted page Rejected
Provide users with credentials for accessing the database Working
Summary for Iteration 3
we focused on the webserver , port forward and firewall entry on the iteration 3 of firewall project .On webserver part ,we had a webserver installed ,created a web page ,and we also created upload section for our customer. port forward is a difficult part ,it took some time to fix it .we also monitored the firewall entry.
Next we are going to test NAT and something the end part of this project.
Next we are going to test NAT and something the end part of this project.
Webserver port forward
The webserver can now be successfully accessed from the outside world. Here's the right configuration we used.
The right adapters for the WAN and LAN interfaces.
Adapter card type: Intel PRO/1000 MT Desktop

DHCP server gives IPs in the range 192.168.1.100/199 .

Currently there are two machines connected, our webserver and a machine representing a client.

Now let's take a look at the actual port forwarding part.
So far just a simle rule was added that enables ouside access of the webserver.

Ofcourse we also need a rule that forwards the HTTP port 80 on the VirtualBox router. We do that in the Settings of our pfSense machine (Network -> Advanced -> Port Forwarding)

And here's the actual result. The webserver is reached on a machine on the external network (a.k.a. the Internet).

update tasklist for iteration 3
update tasklist done
make summery of iteration 3
decide in security level
define subnet for client and server working
configure NAT working
configure proxy filtering
test network
set rules for firewall
confiigure network inc privat network and NAT done
test network from inside and outside
allow upload section on webpage done
allow easy editing of the web page done
configure port forwarding working
correct requirements stake holders block diagram done
make database of members done
loging to logserver done
do customer meeting done
Editing Webpage
The customer wanted to have the ability to edit pages easily, without going through editing the HTML coding, so in order to do that a open source program Kompozer was used. Before choosing it, there was the plan to create such a program, but it turned out that it will take a lot of time, so the group sticked to the usage of Kompozer. Kompozer is simple program which integrates with the webpages and edits them directly, it doesn't have a database. The user is able to do a lot of changes to the webpages like adding likns, backround, editing text, adding pictures and a lot more things. The interface of the program is pretty simple, there is a print screen below which shows it:

Source: http://kompozer.net/

Source: http://kompozer.net/
Monday, March 14, 2011
Port forward problems follow up
I'm gonna try to describe the tiny issues that bugged us so much and took so much time to fix as an attempt to help someone who does not have the expirience of working with pfSense and port forwarding, because even the simplest things need a lot of time when you don't know how they work.
I want to start with the adapter types.
KNOW WHAT TYPE ARE YOU USING AND BE SURE IT IS THE RIGHT ONE!
Otherwise a full load of cr*p may go wrong. Unfortunately we found out the hard way. Here are the problems we encountered when using an unsuitable adapter card:

DHCP does not give IP.

The adapter types not detected.
Now the port forwarding part. When you enter your rules choose the right network interface that ought to be used.
 Otherwise the result may be painful. It is possible that the pfSense stops functioning, because, let's face it, you are playing with it's IP.
For other port forward troubleshooting problems see the link below.
http://doc.pfsense.org/index.php/Port_Forward_Troubleshooting
Friday, March 11, 2011
Stuck on port forwarding
Every attempt on making the webserver reachable from the outside world (the world outside our internal network) using port forwarding in the pfSense simply failed so far. There was a moment it actually worked for a couple of seconds, when bridged interface on a cabled connection was used, but then we switched to wireless and it crashed again.
For the setting up part we used the information found on Group 1 (Group V.O.J.E.V.) 's blog. Here's a link to the certain entry:
http://vojev.wordpress.com/2011/02/28/enable-port-forwarding-virtualbox/
This is the simple rule that was added to enable the connection to the webserver through our router (pfSense):

How to forward ports and add rules see here: http://doc.pfsense.org/index.php/How_can_I_forward_ports_
with_pfSense%3F
There were help attempts from people who already managed to do this but unfortunately they failed too. Is it the system unstable, I don't know, but were working on fixing this nasty issue with all we've got and looking for other help if possible.
Monitor / logging firewall entry
For logging the entry's going through the firewall we are going to use Snort.
Snort is a program that can perform protocol analysis and content searching/matching. It can be used to detect a variety of attacks and probes, such as buffer overflows, stealth port scans, CGI attacks, SMB probes, OS fingerprinting attempts, and much more.
Snort can operate in three modes; it can operate as a packet sniffer, a packet logger, and an IDS.

http://www.snort.org/
More info How to set Snort in PFsense can be found :
http://doc.pfsense.org/index.php/Setup_Snort_Package#Setting_up_snort_package_for_the_first_time
More files, logs and settings will be add'et later
Thursday, March 10, 2011
Uploading section on web site
After discussion with the project customer - Morten Nielsen, the group had to create a upload section to the web page. This will allow the users to upload pictures (another stuff may be defined upon a wish from the customer) to the web server. After going thorugh many troubles with the coding, the section is finally working. When a user clicks the Place to share link, it will redirect him to the window shown below, where the user can select the path for the file and upload it after clicking on Submit.

After the file is uploaded, the user will get page saying - Uploaded, Not uploaded or Already exists. The other information regards the name, size,type and some more relevant information, which may be removed if the customer wishes. Below you can see a screen shot, showing the already exists stage.

Web page
Web page for the server was successfully created. After connecting to the web site, the user is able to go through some sub links called Home, About us, Facilities, Trips, Place to share and Contacts. The appearance of the page was decided with sense of football. There is also a little bit of the football’s history below the section with the sub links and on the right side there is section with News and Events. Below there is a print screen of the web site appearance.

Requirements, Block diagram and state holders
The requirements, state holders and block diagram of the project are updated. Still there will be some changes, but for now the requirements are:
1. The private network's clients must be able to access the Internet cloud.
2. The private network must have webserver for providing the company with website
3. The private network must have database server for storing the details of the members
4. A firewall must be set up to limit traffic between the two networks
5. The firewall must be monitored in both manual and automatic monitoring
6. The services in the private network must be exposed to the external network.
7. The private network must have proxy server installed in order to filter and redirect traffic
8. The services in the network must be accessible from Windows and Linux OSes
The current block diagram looks like this:

And finally the stake holders of the project were corrected due to the backround story:
Project owner: Red leader
Customer: Morten Nielsen from 2 Foot Football club
Users: members of 2 Foot Football Club
Web server
The web server for the football club was successfully installed and configured. Simply the web server will provide the club with a web page and some more features like upload section. After the installation was done, simple phrase was done in html file for testing if the server is working and the testing page result was:


Wednesday, March 9, 2011
tasklist for iteration 3
update tasklist
make summery of iteration 3
decide in security level
define subnet for client and server
configure NAT
configure proxy filtering
test network
set rules for firewall
configure network inc privat network and NAT
test network from inside and outside
allow upload section on web page Done
allow easy editing of the web pages Working
configure port forwarding Working
define subnet for client and server Working
correct requirements, stake holders, block diagram Done
make database of members Working
Summary for Iteration 2
The second iteration of the project was almost oriented in Installation of systems.
It took some time to get the machines up and running. Several Searches and decitions was made to get it up and run in a smoth way.
We had some meating's with our costemer.
I website was made and it is nearly fully opperating.
It took some time to get the machines up and running. Several Searches and decitions was made to get it up and run in a smoth way.
We had some meating's with our costemer.
I website was made and it is nearly fully opperating.
Monday, March 7, 2011
Tasklist for Iteraion 2 / 3 Update 2.0
Tasklist for Iteraion 2 / 3
Tasklist for Iteration 2 / 3
Collect the Virtual Machines - Working
Make Summery of Iteration 2 - Done
Update Tasklist - Done
Update requirements duo to backgrount story - Done
Decide on background story - Done
Install Firewall - Done
Configure Port forwarding - Working
Deside in secureity Level
Install Proxyserver - Done
Configure Proxy Filter - Working
Configure Network inc Privat network and NAT
Install Database Server - Done
Install phpMyadmin and Creat database - Done
Install and configure Webserver - Done
Creat Website - Done
Test network from inside and outside
Database Installation and phpMyadmin
Do to the Tasklist ( install Database Server and install phpMyadmin and Create database )
There have been many interrupts in this task's do to the installation ( Vbox will not make Co-up with me ) and yes i'm irretated of this and in the 3'rd hour on the 3'rd day i'm still waiting


There have been many interrupts in this task's do to the installation ( Vbox will not make Co-up with me ) and yes i'm irretated of this and in the 3'rd hour on the 3'rd day i'm still waiting

Finaly the installation is done of the Ubuntu Database server and with some help the phpMyadmin is allso

Friday, March 4, 2011
database server
Database server provide services to client applications,these services are query, update,transaction management,indexing,caching,query optimization,security and multi-user access control.
The advantages of the database server
The advantages of the database server
- reduce the amount of programming
- to ensure good database security
- data management and restoration of good reliability
- full use of computer resources
- to improve the system performance
Some examples of Database server are DB2,Informix,ingres,SQL Server. the SQL query language is more or less the same in all the database servers.
SQL server is a relational model database server produced by Microsoft.
SQL Server 2008 has many new functions.
It can protect your imformation.SQL Server 2008 can be the entire database ,data files and log file encryption, without the need for change application. and also it allows you te review the operation of youe data,resulting in improved compliance and security.
http://en.wikipedia.org/wiki/Database_serverTask: Install proxy server
As already mentioned on the blog the plan for installing the proxy server is using Squid. Because of the fact that Squid actually does not have it's own GUI at first I decided to use the GADMIN-Squid tool for configuring the proxy server in a graphical interface.
(The packages can be downloaded and installed via the Synaptic Package Manager found under the "System"->"Administration" menu in your Ubuntu OS.)
After the installations are completed you can check if the proxy server is on (or start, stop, restart it) with the following commands:
$ sudo service squid status
$ sudo service squid start
$ sudo service squid stop
$ sudo service squid restart
When it's on you will get a note that it's running and the process ID number.
To give the wanted network(s) access to the server the right permissions need to be set. Edit the Squid configuration file.
(Before you do that you better make a backup copy of the file in case something goes wrong:
$ sudo cp /etc/squid/squid.conf /etc/squid/squid.conf.original #Copy file
$ sudo chmod a-w /etc/squid/squid.conf.original #Protect from writing
Now you have the original file as squid.conf.original and you can safely edit the squid.conf file.)
 Theoreticaly it can be edited in the GUI of the Gadmin software (image on the right), but I couldn`t manage to do so and at the same time keep the server running. A nasty thing happens, the server stops running after a few seconds every time I start it. The only thing that struck into my mind is that Gadmin maybe adds some default settings that are messing with mine, despite the fact that I say 'no' when it asks me if I want to install its default settings... I also looked for some kind of a 'time-to-live' option, but that seemed illogical and I couldn't find anything.
After spending 4 hours yesterday and 3 hours today (Damn.) trying to figure out if it was I who did something wrong I decided to simply add the permissions manually. Open the configuration file:
$ sudo gedit /etc/squid/squid.conf
This is still a testing stage, so the permissions I added are:
- allowed http access for 'internal_network' with IP range of the virtual machines I have in VBox
- allowed http access for 'external_network' with IP range of the IPs my router gives
- denied http access for 'restricted' with IP in the 'external_network' range
How to add permissions see in the bunch of tutorials in the reference section below.
-> https://help.ubuntu.com/6.06/ubuntu/serverguide/C/
squid.html
-> http://www.basicconfig.com/linuxnetwork/setup_ubuntu_
squid_proxy_server_beginner_guide
-> http://www.ehow.com/how_5019947_set-up-proxy-server-ubuntu.html
(The packages can be downloaded and installed via the Synaptic Package Manager found under the "System"->"Administration" menu in your Ubuntu OS.)
After the installations are completed you can check if the proxy server is on (or start, stop, restart it) with the following commands:
$ sudo service squid status
$ sudo service squid start
$ sudo service squid stop

$ sudo service squid restart
When it's on you will get a note that it's running and the process ID number.
To give the wanted network(s) access to the server the right permissions need to be set. Edit the Squid configuration file.
(Before you do that you better make a backup copy of the file in case something goes wrong:
$ sudo cp /etc/squid/squid.conf /etc/squid/squid.conf.original #Copy file
$ sudo chmod a-w /etc/squid/squid.conf.original #Protect from writing
Now you have the original file as squid.conf.original and you can safely edit the squid.conf file.)
 Theoreticaly it can be edited in the GUI of the Gadmin software (image on the right), but I couldn`t manage to do so and at the same time keep the server running. A nasty thing happens, the server stops running after a few seconds every time I start it. The only thing that struck into my mind is that Gadmin maybe adds some default settings that are messing with mine, despite the fact that I say 'no' when it asks me if I want to install its default settings... I also looked for some kind of a 'time-to-live' option, but that seemed illogical and I couldn't find anything.
After spending 4 hours yesterday and 3 hours today (Damn.) trying to figure out if it was I who did something wrong I decided to simply add the permissions manually. Open the configuration file:
$ sudo gedit /etc/squid/squid.conf
This is still a testing stage, so the permissions I added are:
- allowed http access for 'internal_network' with IP range of the virtual machines I have in VBox
- allowed http access for 'external_network' with IP range of the IPs my router gives
- denied http access for 'restricted' with IP in the 'external_network' range
How to add permissions see in the bunch of tutorials in the reference section below.
-> https://help.ubuntu.com/6.06/ubuntu/serverguide/C/
squid.html
-> http://www.basicconfig.com/linuxnetwork/setup_ubuntu_
squid_proxy_server_beginner_guide
-> http://www.ehow.com/how_5019947_set-up-proxy-server-ubuntu.html
Squid software
In connection with the task of creating a proxy server and filter I came across this very popular software called Squid.
Squid is a proxy server and web cache daemon. It has a wide variety of uses, from speeding up a web server by caching repeated requests; to caching web, DNS and other computer network lookups for a group of people sharing network resources; to aiding security by filtering traffic.
- provides proxy and cache services for:
- Hyper Text Transport Protocol (HTTP)
- File Transfer Protocol (FTP)
- includes limited support for several other protocols including:
- Secure Sockets Layer (SSL)
- Domain Name Server (DNS)
- supports a wide variety of caching protocols, such as:
- Internet Cache Protocol (ICP)
- Hyper Text Caching Protocol (HTCP)
- Cache Array Routing Protocol (CARP)
- Web Cache Coordination Protocol (WCCP)
Squid was originally developed by Duane Wessels as the Harvest object cache, part of the Harvest project at the University of Colorado at Boulder.
It was originally designed to run on Unix-like systems, but also runs well on Windows-based systems. Released under the GNU General Public License, Squid is free software.
* Why is Squid a good thing?
Caching proxy servers improves performance of web browsers and reduces bandwidth utilization.
-> http://www.squid-cache.org/
-> http://en.wikipedia.org/wiki/Squid_(software)
Thursday, March 3, 2011
Firestarter
Before the group chose to work with IPcop we looked into several other softwares. This is some info on a really nice firewall program for Linux distributions. I though it may be useful for someone interested in the subject.
Firestarter is an Open Source visual firewall program. The software aims to combine ease of use with powerful features, therefore serving both Linux desktop users and system administrators.
The Firestarter status interface shows the state of the firewall and the network at a glance.
The active connections list shows all the connections tracked by the firewall, including traffic routed through the firewall. It can also tell you which program the connection belongs to.

The Firestarter events interface shows intrusion attempts as they occur in real time.
By right-clicking on the event entry and selecting an action, you can control how the firewall will treat a similar connection the next time it sees one.

The policy page allows you to create security policy with ease.
You can enforce both inbound and outbound traffic policy with Firestarter, as well as black or white list traffic and web sites.
-> http://www.fs-security.com/
Firestarter is an Open Source visual firewall program. The software aims to combine ease of use with powerful features, therefore serving both Linux desktop users and system administrators.
- Open Source software, available free of charge
- User friendly, easy to use, graphical interface
- A wizard walks you through setting up your firewall on your first time
- Suitable for use on desktops, servers and gateways
- Real-time firewall event monitor shows intrusion attempts as they happen
- Enables Internet connection sharing, optionally with DHCP service for the clients
- Allows you to define both inbound and outbound access policy
- Open or stealth ports, shaping your firewall policy with just a few mouse clicks
- Enable port forwarding for your local network in just seconds
- Option to whitelist or blacklist traffic
- Real time firewall events view
- View active network connections, including any traffic routed through the firewall
- Advanced Linux kernel tuning features provide protection from flooding, broadcasting and spoofing
- Support for tuning ICMP parameters to stop Denial of Service (DoS) attacks
- Support for tuning QoS parameters to improve services for connected client computers
- Ability to hook up user defined scripts or rule sets before or after firewall activation
- Supports Linux Kernels 2.4 and 2.6
- Translations available for many languages

The Firestarter status interface shows the state of the firewall and the network at a glance.
The active connections list shows all the connections tracked by the firewall, including traffic routed through the firewall. It can also tell you which program the connection belongs to.

The Firestarter events interface shows intrusion attempts as they occur in real time.
By right-clicking on the event entry and selecting an action, you can control how the firewall will treat a similar connection the next time it sees one.

The policy page allows you to create security policy with ease.
You can enforce both inbound and outbound traffic policy with Firestarter, as well as black or white list traffic and web sites.
-> http://www.fs-security.com/
install firewall
We decide to ues Ipcop firewall for our project, and it have been complety installed in virtualBox.and i am working on IPCop web-interface.
link to ipcop: www.ipcop.org
www.ipcop.org/1.4.0/en/quickstart/html/installing.html
link to ipcop: www.ipcop.org
www.ipcop.org/1.4.0/en/quickstart/html/installing.html
Background Story
Background story
The new formed small football club 2 foot has just purchased a clubhouse and are in need of a small network, therefore they have ask color IT to make a solution.
Customer = Morten Nielsen at 2 foot football club
Contact Person = Morten Jørgensen at Color IT
The new formed small football club 2 foot has just purchased a clubhouse and are in need of a small network, therefore they have ask color IT to make a solution.
Customer = Morten Nielsen at 2 foot football club
Contact Person = Morten Jørgensen at Color IT
Tasklist for Iteraion 2 / 3
Tasklist for Iteration 2 / 3
Update requirements do to backgrount story - Working
Decide on background story - Done
Install Firewall - Working
Configure Port forwarding
Deside in secureity Level
Install Proxyserver - Working
Configure Proxy Filter - Working
Configure Network inc Privat network and NAT
Install Database Server - Working
install phpMyadmin and Creat database - Working
Install and configure Webserver - Working
Creat Website - Working
Test network from inside and outside
The task list can allwayes be configuret if nesseary
More to come
install firewall
One of my tasks today is installing firewall, and i decide to choose comodo Firewall. Now the firewall has been install successfully completed. I am going to use it in our project.
link :www.comodo.com
link :www.comodo.com
Wednesday, March 2, 2011
Summary for Iteration 1
The first iteration of the project was almost fully oriented in research and deciding on what exactly the group is doing (based on what the customer wants), system components, stakeholders, requirements, creating diagrams for easyning the demonstration and making it as much understandable for the customer as possible. A research was made on the different services such as Web and Proxy servers, Firewall, NAT, Routing, pfSense. So far several virtual machines with variety of Operating systems were installed to fulfill the vital requirements of this small network: a Debian machine for the servers (exactly what servers the group has in mind can be seen on the Block diagram at the Diagrams page of the blog), a Ubuntu machine for monitoring, a pfSense virtual machine playing the role of the router and a Windows XP machine as a client's PC. Despite the little delay, the group will be back on it's feet and on schedule very soon knowing that everything will be done in order for the work to go more smoothly.
Tuesday, March 1, 2011
Ubuntu
The installation of an Ubuntu virtual machine was successfully accomplished. Now installing the ipcop in order to test GUI and functionallity.
Network Address Translation
NAT stands for Network Address Translation and it is the process in which the information in the IP’s datagram header is rewritten by a router or firewall. In this way many hosts of a private network can reach the internet while using one and the same IP address.
The NAT is widely used for hiding the real IPs of the private network and the essence of this mechanism is related to all the outgoing traffic through the firewall to the outside networks. Once reached the firewall, the packet gains an IP from the firewall which is configured by an administrator. In the RFC 1918 are defined the following 3 address ranges for using in the private networks:
10.0.0.0 – 10.255.255.255
172.16.0.0 – 172.31.255.255
192.168.0.0 – 192.168.255.255
The above mentioned address spaces are used for private networks and aren’t accessible from anywhere, besides the private network. This means they are protected from outside attacks. The primary function of the NAT is to provide them with access to the internet, while masking them with one of its IP addresses before delivering the request to external network. This way the NAT provides one way access to internet, meaning the host in the private network can connect directly to other hosts, but the hosts outside the private network cannot connect this host.
Practically 4 basic types of address translation exist, but 2 of them are mostly used – static NAT and dynamic NAT.
The static NAT means that on the router are configured certain amount of IP addresses which respond to another amount of IP addresses, used in the private network, thus between the private and external network exists certain connection.
Example:Internal address - External address
192.168.1.1 - 193.65.76.1
192.168.1.2 - 193.65.76.2..
192.168.2.1 - 193.76.77.1
Dynamic NAT means that on the router are configured certain amount of IP addresses which are taken for usage for external addresses in a need, thus in the private network there can be big amount of active connections to the external, but the addresses of the external network can be more than those active connections.
Example:Internal address – External address
192.168.1.17 - 193.65.76.2
192.168.1.22 - 193.65.76.3
192.168.1.29 - 193.65.76.4..
References:
http://en.wikipedia.org/wiki/Network_address_translationvv
Firewall
Firewall is specialized software, hardware or sometimes the combination of them. The Firewall checks the network traffic going through it according to some specified rules or criteria and either denies or provides access to certain traffics. The main usage of the firewalls is to prevent from unauthorized access.
An example of firewall is the block diagram in fig.1. In this block diagram there is private network consisting of 2 servers and a client and an external client connected through the internet. For an example if in the private network there is FTP server, the Firewall could be configured to deny access to the external client who is trying to download file.

Figure 1
Firewalls are working on the different layers of the OSI model and they cover all 7 layers. Mostly the firewalls work on the network and transport layer, where they explore the packet datagram of TCP/IP protocols and make decisions regarding the IP address of the sender or the destination, the port number of which the packet is received or will be sent to, or any other combination of those parameters. The firewalls working on the application layer take care of issues like spam, computer viruses and Trojans looking for them in the packet’s relation to information.
More deeply there are several type classifications of the firewalls depending on where the communication is taking place and the state that is being traced for taking action against it. They are Network layer and packet filters, Application-layer, Proxies and Network address translation (NAT).
The Network layer firewall or also called packet filters operate at very low level of the TCP/IP stack, and their aim is to block the passing of packets, which do not match the rules set by the administrator, through the firewall.
There are 2 sub-categories of the network layer firewalls – stateful and stateless. The stateful firewalls focus on the active sessions which provide speed at the packet processing. The existing network connections can be described by several properties – source and destination IP address, UDP or TCP ports, and the current stage of the connection lifetime (session initiation, handshaking, data transfer or complete connection). If a packet does not match an existing connection, it will be redirected for new connection and if it does, it will be allowed to pass without further processing.
The stateless firewalls are faster for simple filters and they require less memory. They also may take part at filtering stateless network protocols that have no concept of a session. Their main disadvantage is that they can’t make more complex decisions on what stage communications between hosts have reached.
The application layer firewalls work on the application level of the TCP/IP stack. They provide security in delivering packets of applications such as FTP and Telnet servers and block the not related packets (usually dropping them without acknowledgement to the sender). Application firewalls also inspect all packets for containing improper content like computer worms and Trojans.
In general the application firewalls prevent the protected machines from unwanted outside traffic.
The Proxies sometimes are used as firewall and upon that usage they are responsible for responding to connection requests like an application, while blocking packets from other unwished connections. The proxy effectively hides the true IP address of the user.
Network Address Translation (NAT) is the process in which the information in the IP’s datagram header is rewritten by a router or firewall. In this way many hosts of a private network can reach the internet while using one and the same IP address. NAT is used for hiding IP addresses of private networks.
Note: The diagram is hard to read due to some issues with the blogspot.com. If the reader has difficulties please contact on westside_gesh@abv.bg for recieving the jpeg file.
Task: Install Debian in a virtual machine
A Debian image file has been downloaded and installed in VBox.
Task done.
It's going to be used for the servers in the system.
http://www.debian.org/distrib/
Task done.
It's going to be used for the servers in the system.
http://www.debian.org/distrib/
PFsense routing Installation and setup
Pfsense
The installation of Pfsense did take som time but is up and running now.
 This is the ip of the WAN and LAN

For more info to install PFsense look at : http://doc.pfsense.org/index.php/Installing_pfSense
The installation of Pfsense did take som time but is up and running now.

For more info to install PFsense look at : http://doc.pfsense.org/index.php/Installing_pfSense
Proxy
One of the tasks was to do research on Proxy servers.
It's a computer that sits between a client and a server to intercept requests.
There are several uses of a proxy server, but the most common is to speed network traffic by caching pages or files that are requested often. By doing so, the proxy server can deliver the request quickly, only polling the server when required. In this way, a proxy server not only speeds up network traffic, but also relieves server load.
Filtering or censorship is another use for a proxy server. A company that provides Internet connectivity to its emloyees might configure a proxy server to block requests for certain websites.
Implementing a proxy server into the system is taken in consideration and depends on time and resources. Info will be given at a later point in the project.
Full info
-> http://en.wikipedia.org/wiki/Proxy_server
List of worldwide proxy servers
-> http://www.publicproxyservers.com/proxy/list1.html
How to setup Secure Webserver HTTPS (SSL) on Apache in Ubuntu
- what we need?
- apache(webserver)
- openssl
step 1:create a self-signed certificate
you need to create a self-signed certificate with openssl. to do that you will need to generate the server key.openssl genrsa -des3 -out server -sec.key 4096
...and certificate signing request(csr)
openssl req -new-key server -sec.key -out server.csr
after that,generate the server certificate by signing it with the server key.
openssl X509 -req-days 365 -in server .csr-signkey server-sec.key-out server.crt
keep the server-sec.key in the secure location,with read/write permission assigned only to root.The generate a password-less copy of the key for Apache use.
openssl rsa -in server-sec.key -out server.key
By this time,you should have:
- server.key(passwordless key for Apache)
- server .csr(certificates signing request)
- server.crt(certificate)
- server -sec.key (server key)
step2:enable SSL config in Apache
in this step.you must enable SSL website in Apache by creating a symlink of 'default-ssl'.
1n -s/etc/apache2/sites -available/default -ssl/etc/apache2/sites-enabled/100-default-ssl
The edit/etc/apache2/sites-available/default -ssl file using your favorite text editors(i prefer nano!)and change the config from something this:
serveradmin webmaster@localhost
servername localhost
documentroot/var/www-ssl/html/
...
...
Then in the same default-ssl file,find a line that begins with "SSLEngine on"and add the following lines
SSLEngine on
..
..
#SSLCertificatefile/etc/ssl/certs/ssl-certs-snakeoil.pem
#SSLCertificatekeyfile/etc/ssl/certs/ssl-cert-snakeoil.key
SSLCertificateFile/etc/apache2/ssl/server.crt
SSLCertificatekeyFile/etc/apache2/ssl/server.key
step3:copying certificates and activating SSL.
Ensure that the config file has been saved.Then as root,create /etc/apache2/ssl/directory,then copy the certificate and server key generated from step 1 to /etc/apache2/ssl/directory.mkdir/etc/apache2/ssl
cp server.key/etc/apache2/ssl
cp server.crt/etc/apache2/ssl
After that ,enable SSL module by typing
a2enmad ssl
Finally ,restart apache2 by typing(as root,sudo):
/etc/init.d/apache2 restart
result :a secure HTTP connection
Subscribe to:
Posts (Atom)